The article discusses Jasper AI, transform the way you create content with Jasper AI! Discover the power of artificial intelligence in writing with its AI-powered content creation service. Create high-quality, original content for your blogs, business, or personal needs in a matter of seconds. With user-friendly interface and affordable pricing, Jasper AI is the perfect tool for enhancing your writing skills and improving productivity. Check out here for a comprehensive review and real-life examples of using Jasper AI.
Blogger to WordPress: Migrate Without Losing Traffic & Rankings
Blogger to WordPress Migration —
A lot of people start their Blogging career with the free blogging platform, like Blogger. However, Blogger does have a lot of limitation, which I have discussed in my comparison of Blogger Vs WordPress. Most of the Bloggers eventually realize this and want to shift from Blogger to WordPress, but are afraid of losing their organic traffic and search rankings.
However, it is possible to migrate from Blogger to WordPress by retaining your ranking and also diverting your organic traffic. In this guide am going you to explain the same with simple and easy to understand steps.
Please note: This article explains transferring your Blog from Blogger to WordPress only if you are using a Blogspot sub-domain. If you are using a custom domain, the steps will be slightly different. For custom domain blogger, you can refer my guide on How To Transfer Custom Domain Blogger Blog To WordPress

STEPS TO MIGRATE FROM BLOGGER TO WORDPRESS
How to convert Blogger into website? How to move my Blogspot contents into a WordPress blog? How to switch your blog from Blogger to WordPress? How to Shift Blogger to Wordpress with keeping SEO? To answer these, just follow the steps shown below...Steps to Migrate from Blogger (BlogSpot) to WordPress:
1. Select A Domain Name And Hosting
The first thing that you will have to do is buy a custom domain and a hosting plan from a reliable Hosting provider.For Hosting, I would recommend Hostinger as it is the most trusted hosting provider and is officially recommended by WordPress.
Also with every Hostinger plan you get a free Domain. So you do not have to spend extra for domain names. An Annual plan of Hostinger will cost you $4.95 per month whereas a 3 years plans will cost you $3.49 per month
Check; Hostinger Review (Pros And Cons) 90% OFF Discount Coupon Codes (Video)
However, if you are not generating enough Traffic and so want to go for cheaper domain, GoDaddy would be the best option. A yearly subscription of GoDaddy will cost you $3.99 per month.
However, GoDaddy always provides special offers to ProBlogBooster. The monthly charges can be as low as $1/month. While I try my best to update this article with latest and cheapest GoDaddy offers, I would recommend you to check the deals section for availing the best offer.
2. Install WordPress On Your Hosting Server
Most of the hosting provider including Hostinger provide one click installation for WordPress. However, the steps for installing may be slightly different for each host.3. Preparing Your WordPress Blog
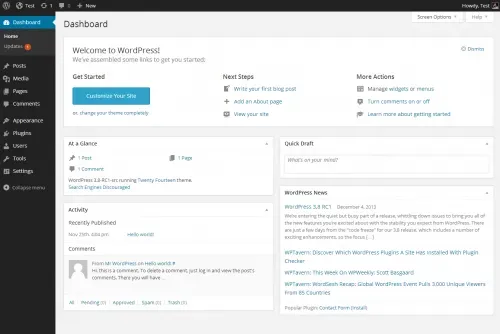
Once WordPress is installed, you can now access your WordPress dashboard atwww.yourblog.com/wp-admin. Just replace the domain name with yours.

At this stage you must just select and customize your theme so that you do not have to experiment with it once your blog is Live. You may either use the default WordPress theme or download a free theme from WordPress repository or buy a premium theme from various theme providers. Plugins, you can install later.
Also make sure to delete the default WordPress post which is automatically created at the time of installation before moving to next step. We will discuss the reason for doing this in next points.
4. Transfer Your Blog Posts From Blogger To WordPress
The next step is to move your Blog posts from Blogger to WordPress.There are many Plugins available which help you to move your Blog securely, but I personally prefer using the default Blogger to WordPress Plugin. Please note, this plugin does not transfers only posts, pages you will have to transfer manually.
Following are the detailed steps for moving your Blog Posts
- Navigate to your Blog at Blogger.com and Click Settings. In the Sub-menu that opens, click on “Other”.
- Click on Export blog as shown. A pop-up will appear asking you to download the blog. Click on Download and save the file at an easily accessible location.
- Next head on to your WordPress Dashboard. Click on Import button located under the Tools menu.
- Now click on Blogger, you will be asked to Install Plugin. Click on Install and on the next page, click on “Activate Plugin and Run Importer”
- Select the XML file which we downloaded from Blogger and click on “Upload file and Import” button.
- You will next be asked to assign authors to the posts. You may either assign it to yourself or create a new User. You can always change it later.
- After Submitting the author, you will now receive the succeed message. However, in some cases, the plugin may not be able to upload all the pics and will rather display an error. You will then have to check for missing images and upload them manually. However, your Posts wile be live on WordPress.
5. Check The Permalink Structure
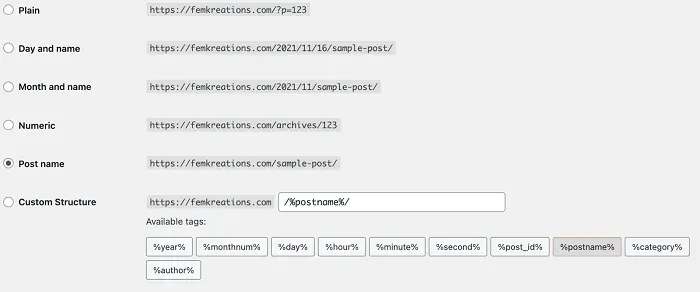
To check your permalink structure; click on settings and then Permalinks. You will see the following screen.
If it is different, choose custom structure option and copy paste
/%year%/%monthnum%/%day%/%postname%/ in it and submit.
Now open your website and check few links if everything is working fine.
6. Redirecting Visitors To Your New Domain
This is very important step. If you do not complete it correctly, your Blogspot domain will not redirect to your new domain and you will lose all the traffic and rankings. To pass on the link juice we have to redirect your Blogspot domain to new domain using 301 redirect. This tells the search engine that your post has permanently moved to a new place. To achieve this, we will use Blogger 301 Redirect Plugin. This plugin will help you do the following:- Redirect all your visitors to the correct post at the new domain.
- Add rel=canonical tag to your Blogger Blog, The Canonical Tag informs the search engine that your new post is the original and the same should be indexed.
- In case of any 404 errors, redirect your users to 'Home Page'
- Redirect your Blogger Post Feeds to WordPress Feeds
- Redirect Blogger Comments Feeds to WordPress Feeds
- Redirect Blogger Archives to WordPress
- To get started, first download the plugin from WordPress repository and activate it. After activation you will find the plugin under settings.
- Just check the options within the red box and leave the rest unchecked and save the changes. Below, on the same page, you will find 2 different codes, one for New Blogger Template and other for Classic Blogger Template. If you have recently registered with blogger, you are using New Blogger Template. Copy the code in the New Blogger Template Box.
- Now open your Blogger Blog and click on Template and on the next page, click on Edit HTML. Now, remove all your Blogger Template codes (You can back it up in case something goes wrong) and replace them with the code you copied earlier from Blogger 301 Redirect plugin and click on save template.
Just open few random posts with your old Blogspot link to check if it redirects to the correct post and not the Home page.
7. Change WordPress Permalink To SEO Friendly Structure (Optional)
Blogger permalinks are not SEO friendly. This is the reason you must consider changing your Permalink structure.To do so, just open the Permalinks section again and check the option “Post Name”. That’s it. WordPress will take care of the rest.
You can now go ahead and publish new posts.
Bottom Line
Though a lot of people are afraid of migrating from Blogger to WordPress, you now know it is not at all difficult.Using above method you can easily redirect your old Blogspot domain to new custom domain, while retaining your search rankings and visitors.
You have also successfully replaced the ugly Blogger Permalinks to SEO friendly WordPress Permalinks.
Have any questions? Feel free to ask it in the comments section below.


![[100% Fix] Need For Speed: Most Wanted WideScreen 60FPS | HD Texture Resolution | Modern Rockport 2](https://blogger.googleusercontent.com/img/b/R29vZ2xl/AVvXsEgmAcC1qwFPFtKso6c2rVa1wwB7hRoU0eftETdBIt25S2v8vsQLvXZ4Y91fR-lVXl2PhMPjExn4bqmS6BpziBvtFb4REP1ghOqNjBMEOowZrRInoePsItoRoCAPUs9guwOVaCp154fegLqs-SHYk5r8lPnf9zgLJKcVb8Mv_Bq8lhdE9gyvZElzhr9osuwf/s1600/Need-For-Speed-Most-Wanted-WideScreen-Fix.webp)

